In this tutorial we will validate all the form controls like Input Text, Radio button, Checkbox, File upload and Select box etc. Validate forms like you’ve never validated before!

Using a jQuery plugin to validate forms serves a lot of purposes. It gives you additional abilities like easily displaying custom error messages and adding conditional logic to jQuery form validation. A validation library can also help you add validation to your HTML forms with minimal or no changes to the markup. The conditions for validity can also be added, removed, or modified at any time with ease.
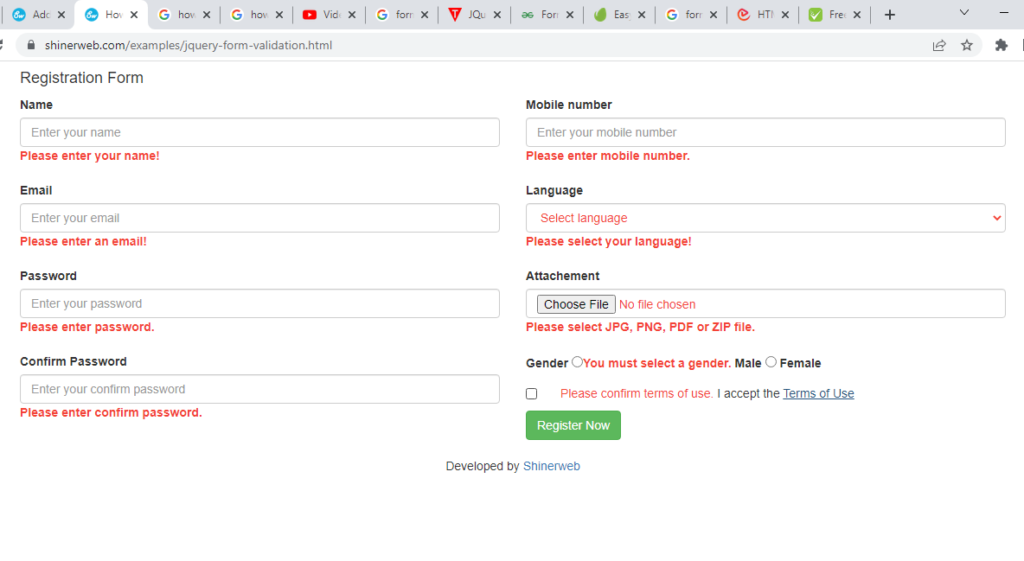
Now we have created one simple HTML form to perform all the validation and the form will be displayed as below.
We need to follow below steps to create registration form and set validation on the form.
Step 1: Create one HTML file and add below CSS and jQuery library inside <head> tag. Which is required for validations.
<head>
<!-- Required library for validation -->
<script src="https://cdnjs.cloudflare.com/ajax/libs/jquery/3.6.0/jquery.min.js" ></script>
<script type="text/javascript" src="https://cdn.jsdelivr.net/npm/[email protected]/dist/jquery.validate.js"></script>
<script type="text/javascript" src="https://cdn.jsdelivr.net/npm/[email protected]/dist/additional-methods.min.js"></script>

<!-- Bootstrap theme -->
<link rel="stylesheet" href="https://maxcdn.bootstrapcdn.com/bootstrap/3.4.1/css/bootstrap.min.css">
<script src="https://maxcdn.bootstrapcdn.com/bootstrap/3.4.1/js/bootstrap.min.js"></script>
</head>
In above code jquery.min.js is a JavaScript library designed to simplify HTML DOM tree traversal and manipulation, as well as event handling, CSS animation, and Ajax.
Also we have added two more library jquery.validate.js and additional-methods.min.js which is used to apply the validation plugin, plus a few annotations on each element to specify the validation rules.
For form design we have used Bootstrap framework
Step 2: The following HTML code demonstrates the form design for user input. Which is write inside <body> tag.
<body>
   <div class="container">
      <h4>Registration Form</h4>
      <form name="registration_form" id="registration_form" method="post" action="#" enctype="multipart/form-data" >
         <div class="row">
            <div class="col-sm-6">
               <div class="form-group">
                  <label for="name">Name</label>
                  <input type="text" name="name" id="name" class="form-control" placeholder="Enter your name">
               </div>
               <div class="form-group">
                  <label for="email">Email</label>
                  <input type="text" name="email" id="email" class="form-control" placeholder="Enter your email">
               </div>
               <div class="form-group">
                  <label for="password">Password</label>
                  <input type="password" name="password" id="password" class="form-control"  placeholder="Enter your password">
               </div>
               <div class="form-group">
                  <label for="conf_password">Confirm Password</label>
                  <input type="password" name="conf_password" id="conf_password" class="form-control" placeholder="Enter your confirm password">
               </div>
            </div>
            <!-- end col -->
            <div class="col-sm-6">
               <div class="form-group">
                  <label for="mobile_number">Mobile number</label>
                  <input type="number" name="mobile_number" id="mobile_number" class="form-control"  placeholder="Enter your mobile number">
               </div>
               <div class="form-group">
                  <label for="language">Language</label>
                  <select name="language" id="language" class="form-control" >
                     <option value="">Select language</option>
                     <option value="English">English</option>
                     <option value="Spanish">Spanish</option>
                     <option value="Hindi">Hindi</option>
                     <option value="Arabic">Arabic</option>
                     <option value="Russian">Russian</option>
                  </select>
               </div>
               <div class="form-group">
                  <label for="attachement">Attachement</label>
                  <input type="file" name="attachement" id="attachement" class="form-control" >
               </div>
               <div class="form-check">
                  <label for="gender">Gender</label>
                  <input type="radio" name="gender" id="gender1" class="form-check-input" value="male">
                  <label class="form-check-label" for="gender"> Male </label>
                  <input type="radio" name="gender" id="gender2" class="form-check-input" value="female">
                  <label class="form-check-label" for="gender"> Female </label>
               </div>
               <div class="checkbox">
                  <label><input type="checkbox" name="term_of_use" id="term_of_use"> I accept the <a href="#">Terms of Use</a> </label>
               </div>
               <button type="submit" class="btn btn-success">Register Now</button>
            </div>
            <!-- end col -->
         </div>
         <!--  end row -->
      </form>
   </div>
   <br>
   <center>Developed by <a href="https://shinerweb.com/">Shinerweb</a></center>
</body>
In above code you must have to declare id inside <form> tage like id=”registration_form” and that id will use for form validation.
Step 3: The following jQuery code for validation and that code will be run while submit your form.
<script type = "text/javascript">
   // ---- form validation
   $( "#registration_form" ).validate({
     rules: {
       name: {
         required: true
   	},
   	email: {
         required: true,
         email:true
   	},
   	password: {
       	  required: true,
            minlength: 3
   	},
   	conf_password: {
         required: true,
         equalTo: "#password"
   	},
   	mobile_number: {
         required: true,
         minlength:10,
         maxlength:10
   	},
   	gender: {
   		required:true
   	},
   	language: {
   		required:true
   	},
   	gender: {
   		required:true
   	},
   	attachement: {
   		required: true,
   		extension: "pdf|jpeg|png|jpg|zip|7z",
   		filesize: 5242880 // 1048576 means 1 MB
   	},
   	term_of_use: {
   		required: true
   	}
     },
     messages : {
   	name: {
         required: "Please enter your name!"
       },
   	email: {
         required: "Please enter an email!",
         email: "Please enter valid email address."
       },
       password: {
         required: "Please enter password."
       },
   	 conf_password: {
         required: "Please enter confirm password.",
         equalTo: "Password and confirm password does not match"
       },
       mobile_number: {
         required: "Please enter mobile number."
       },
       gender: {
         required: "You must select a gender."
       },
       language: {
         required: "Please select your language!"
       },
       gender: {
         required: "You must select a gender."
       },
   	attachement: {
   		required: "Please select JPG, PNG, PDF or ZIP file.",
   		extension: "File must be JPG, PNG, PDF or ZIP.",
   		filesize:"File size must be less than 5 MB."
   	},
   	term_of_use: {
   		required: "Please confirm terms of use."
   	}
     }

   });
</script>
<script type = "text/javascript">
   // ---- set custome validate method for letter allow only
   jQuery.validator.addMethod("lettersonly", function(value, element)
   {
   return this.optional(element) || /^[a-z ]+$/i.test(value);
   }, "Please enter alphabets only.");
   // ---- set custome validate method for filesize
   jQuery.validator.addMethod('filesize', function (value, element, param) {
   return this.optional(element) || (element.files[0].size <= param)
   }, 'File size must be less than {0}');
</script>
In above code we have use one method validate() which is call while form submit and inside this method we have set some rules and their messages.
Now everything is done, please check the output and also we have share source code for easy to setup.
Here some set of standard validation methods is provided by jQuery validation plugins:
- required – Makes the element required.
- remote – Requests a resource to check the element for validity.
- minlength – Makes the element require a given minimum length.
- maxlength – Makes the element require a given maximum length.
- rangelength – Makes the element require a given value range.
- min – Makes the element require a given minimum.
- max – Makes the element require a given maximum.
- range – Makes the element require a given value range.
- step – Makes the element require a given step.
- email – Makes the element require a valid email
- url – Makes the element require a valid url
- date – Makes the element require a date.
- dateISO – Makes the element require an ISO date.
- number – Makes the element require a decimal number.
- digits – Makes the element require digits only.
- equalTo – Requires the element to be the same as another one