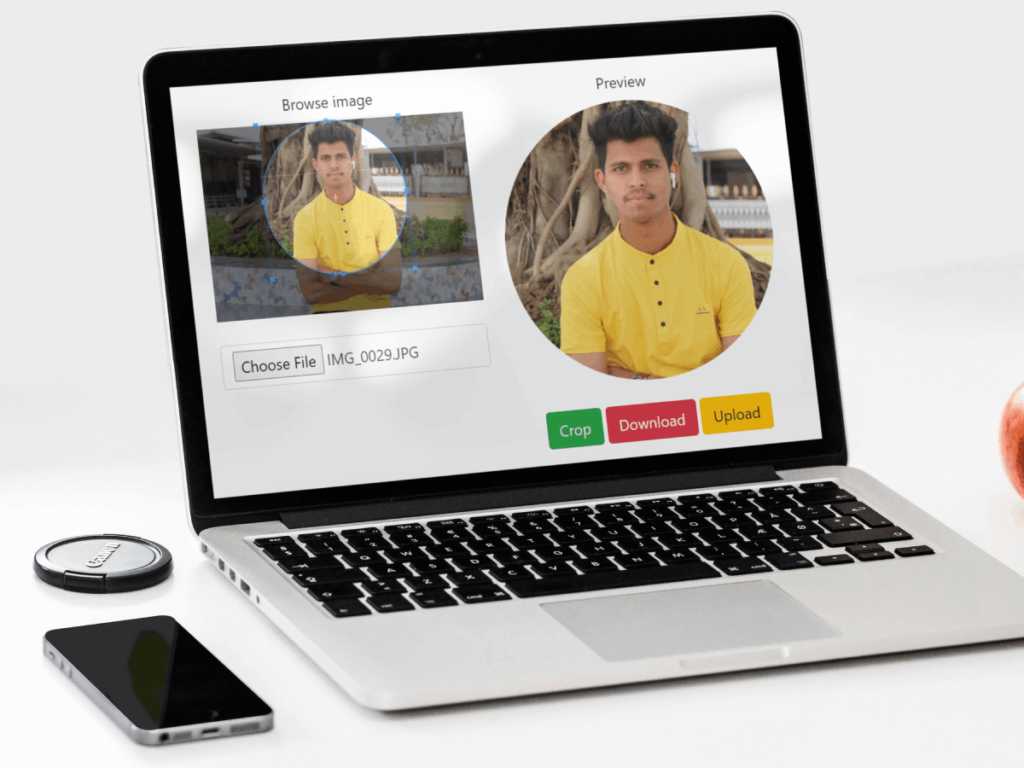
In this blog we will create live example to crop an image in round shape and download that image. Also we will upload that image on your server. We are use Cropper.js JavaScript library to crop an image in circle shape.

Now let’s see step by step how to configure Cropper.js for crop an image in round shape.
Step 1: Start with a simple basic web page and add below code in one html file.
<html>
  <head>
    <title>How to crop image in round shape by using Cropper.js</title>
    <meta content='width=device-width, initial-scale=1.0, maximum-scale=1.0, user-scalable=0' name='viewport' />
    <meta name="viewport" content="width=device-width" />
    <link rel="stylesheet" href="https://maxcdn.bootstrapcdn.com/bootstrap/4.0.0/css/bootstrap.min.css" />
    <link rel="stylesheet" href="https://cdnjs.cloudflare.com/ajax/libs/cropperjs/1.5.12/cropper.min.css" />
  </head>
  <style>
    .container {
      margin: 20px auto;
      max-width: 640px;
    }

    img {
      max-width: 100%;
    }

    .cropper-view-box,
    .cropper-face {
      border-radius: 50%;
    }

    /* The css styles for `outline` do not follow `border-radius` on iOS/Safari (#979). */
    .cropper-view-box {
      outline: 0;
      box-shadow: 0 0 0 1px #39f;
    }
  </style>
  </head>
  <body>
    <div class="container">
      <div class="row">
        <div class="col-lg-6" align="center">
          <label onclick="start_cropping()">Browse image</label>
          <div id="display_image_div">
            <img name="display_image_data" id="display_image_data" src="dummy-image.png" alt="Picture">
          </div>
          <input type="hidden" name="cropped_image_data" id="cropped_image_data">
          <br>
          <input type="file" name="browse_image" id="browse_image" class="form-control">
        </div>
        <div class="col-lg-6" align="center">
          <label>Preview</label>
          <div id="cropped_image_result">
            <img style="width: 350px;" src="dummy-image.png" />
          </div>
          <br>
          <button type="button" class="btn btn-success" id="crop_button">Crop</button>
          <button type="button" class="btn btn-danger" id="download_button" onclick="download()">Download</button>
          <button type="button" class="btn btn-warning" id="upload_button" onclick="upload()">Upload</button>
        </div>
      </div>
      <!--  end row -->
    </div>
    <!-- end container -->
    <script src="https://code.jquery.com/jquery-3.5.1.min.js"></script>
    <script src="https://maxcdn.bootstrapcdn.com/bootstrap/4.0.0/js/bootstrap.min.js"></script>
    <script src="https://cdnjs.cloudflare.com/ajax/libs/cropperjs/1.5.12/cropper.min.js"></script>
  </body>
</html>
In above code we have included bootstrap.min.css and cropper.min.css which is used for design a web page and cropping image designing. We also included some JavaScript library jquery-3.5.1.min.js, bootstrap.min.js and cropper.min.js which is most useful for cropping an image.
Step 2: Configure some JavaScript code for crop an image.
<script>
  $("body").on("change", "#browse_image", function(e) {
        var files = e.target.files;
        var done = function(url) {
          $('#display_image_div').html('');
          $("#display_image_div").html(' < img name = "display_image_data"
            id = "display_image_data"
            src = "'+url+'"
            alt = "Uploaded Picture" > ');
          };
          if (files && files.length > 0) {
            file = files[0];
            if (URL) {
              done(URL.createObjectURL(file));
            } else if (FileReader) {
              reader = new FileReader();
              reader.onload = function(e) {
                done(reader.result);
              };
              reader.readAsDataURL(file);
            }
          }
          var image = document.getElementById('display_image_data');
          var button = document.getElementById('crop_button');
          var result = document.getElementById('cropped_image_result');
          var croppable = false;
          var cropper = new Cropper(image, {
            aspectRatio: 1,
            viewMode: 1,
            ready: function() {
              croppable = true;
            },
          });
          button.onclick = function() {
            var croppedCanvas;
            var roundedCanvas;
            var roundedImage;
            if (!croppable) {
              return;
            }
            // Crop
            croppedCanvas = cropper.getCroppedCanvas();
            // Round
            roundedCanvas = getRoundedCanvas(croppedCanvas);
            // Show
            roundedImage = document.createElement('img');
            roundedImage.src = roundedCanvas.toDataURL()
            result.innerHTML = '';
            result.appendChild(roundedImage);
          };
        });

      function getRoundedCanvas(sourceCanvas) {
        var canvas = document.createElement('canvas');
        var context = canvas.getContext('2d');
        var width = sourceCanvas.width;
        var height = sourceCanvas.height;
        canvas.width = width;
        canvas.height = height;
        context.imageSmoothingEnabled = true;
        context.drawImage(sourceCanvas, 0, 0, width, height);
        context.globalCompositeOperation = 'destination-in';
        context.beginPath();
        context.arc(width / 2, height / 2, Math.min(width, height) / 2, 0, 2 * Math.PI, true);
        context.fill();
        return canvas;
      }


</script>
Step 3: For download cropped image you need to use below function code.
function download() {
    var linkSource = $('#cropped_image_result img').attr('src');
    var fileName = 'download.png';
    const downloadLink = document.createElement("a");
    downloadLink.href = linkSource;
    downloadLink.download = fileName;
    downloadLink.click();
}
Step 4: If you also want to upload an image on server then you need to use below function.
function upload() {
    var base64data = $('#cropped_image_result img').attr('src');
    //alert(base64data);
    $.ajax({
        type: "POST",
        dataType: "json",
        url: "crop_image_upload.php",
        data: {
            image: base64data
        },
        success: function(response) {
            if (response.status == true) {
                alert(response.msg);
            } else {
                alert("Image not uploaded.");
            }
        }
    });
}
Step 5: Now once you create above function you need to create one PHP file and add below code.
<?php
$folderPath = 'upload_images/';
$image_parts = explode(";base64,", $_POST['image']);
$image_type_aux = explode("image/", $image_parts[0]);
$image_type = $image_type_aux[1];
$image_base64 = base64_decode($image_parts[1]);
$file = $folderPath . uniqid() . '.png';
file_put_contents($file, $image_base64);
$response = array(
                'status' => true,
                'msg' => 'Image uploaded on server successfully!',
				'file' => $file
            );
echo json_encode($response);
?>
Step 6: Finally you need to create one folder where will store or save cropped image in that folder.

If you have any query and problem while configuration this code please write comments or you can also write comments in our youtube video.
In above example we will cove all the below points:
- How do I crop a round image?
- How do you crop an image in JavaScript?
- How to crop and download image


